Using CAS without the CAS login screen

Posted on

Using CAS without the CAS login screen - Central Authentication Service - Jasig Wiki

  1. Dashboard")
  2. Central Authentication Service
  3. CASifying Applications
  4. Using CAS without the CAS login screen

Using CAS without the CAS login screen

Skip to end of metadata

This page is for documenting how to use CAS without using the CAS login screen.

Why not to do this

One of the advantages CAS brings to the table is a single authentication user experience across all applications using CAS. The user doesn't have to wonder whether he should be giving his password to any particular application, because no applications other than CAS receive the password.

Implementing this hack results in applications other than CAS having access to actual usernames and passwords. This is a bad thing. It reduces the security value CAS is trying to give you.

Existing features

The CAS gateway feature allows your application to attempt to use CAS single sign on to authenticate the user without interrupting the user experience to display a CAS login screen. If no SSO session already exists, CAS simply redirects back to your service without displaying the login screen.

Alternative approaches

An alternative to your application rendering its own login screen is to get CAS Server to render the login screen you would have wanted to render. WIND goes this route. This is on the feature list for CAS 3.

A relatively easy option (for portals, at least) is to proxy the HTML of the CAS login page and display it inline in the portal page. The proxied form should still submit to CAS itself. You can tweak the CAS jsps to use different CSS styles depending on the User Agent or Remote Host, to provide a modified (e.g. smaller) login screen.

Using CAS without the login screen

Suppose you really do want your service to be handling the user's username and password.

First, produce your custom form. When your custom form submits, the recipient of the submit needs to do the following:

Validate the username and password

Somehow, you need to figure out whether this username and password are correct.

One thing to do would be to generate an HTTP request for CAS login, parse out a valid login ticket, then issue a request for CAS login posting the login ticket, username, and password. Parse the response. If it indicates a success, the username and password are valid. Otherwise not.

Another thing to do would be to go directly against whatever it is that CAS is using to validate usernames and passwords.

If the username and password didn't match, redisplay your form. If they did match, then either 1) you're done because all you wanted to do was authenticate the user, or 2) now you need to establish the CAS SSO session in the web browser and obtain a Service ticket.

Establish the SSO session and possibly get a Proxy Ticket

Again, get a login ticket and the jsessionid. Then, generate a redirect to the browser placing the sesisonid, login ticket, the username, and the password on the CAS login URL to which you're redirecting: ?https:

//cas.example.com/cas/login;jsessionid=XXXXXXXX?username=XXXXXXX&password=XXXXXXX&lt=XXXXXX

Specify the service to be your application where you want to receive the service ticket.

CAS will set the Single Sign On cookie so the user will have a CAS SSO session established.

Since the username, password, and login ticket are good, CAS will redirect back to your service with the service ticket. Grab the service ticket and validate it in the normal way (presumably using a CAS client). This is your opportunity to obtain a Proxy Ticket.

Note: This only works as long as the user has not visited the CAS webpage before. Otherwise he or she got a different sessionid cookie which has priority over the sessionid in the url.

Experience Reports

Here is an experience report on how an UI-less mode for CAS has been achieved using javascript only on the client side. Passwords are only handed over to the SSL secured CAS service, not to a third party. Labels:

None

Edit Labels") Powered by a free Atlassian Confluence Open Source Project License granted to Java Architectures Special Interest Group. Evaluate Confluence today. This Confluence installation runs a Free Gliffy License - Evaluate Gliffy for your Wiki!

EhCache配置文件

Posted on

EhCache配置文件 - 奈何桥收费站。。。 - ITeye技术网站

首页 资讯 精华 论坛 问答 博客 专栏 群组 更多 ▼

招聘 搜索

您还未登录 ! 登录 注册

奈何桥收费站。。。

EhCache配置文件 **

博客分类:

Xml代码 收藏代码

  1. <?xml version="1.0" encoding="UTF-8"?>
  2. <!--
  3. CacheManager配置
  4. ==========================
  5. 一个ehcache.xml 相当于一个单个的CacheManager
  6. 学习下面的说明或者ehcache构架(ehcache.xsd)怎样配置
  7. 系统资源标识在这个文件中能被具体制定,当配置被加载时,他们将会被替换。例如 multicastGroupPort=${multicastGroupPort}被环境变量的系统属性替换,或是使用如-DmulticastGroupPort=4446命令行开关指定一个系统属性。
  8. 的属性如下:
  9. /* name – CacheManager的可选名称。这个名称起初主要是用于文档记录或辨别Terracotta集群状态。对于Terracotta集群的缓存,一组CacheManager名称和cache名称唯一的鉴定了一个特定的存储于Terracotta集群存储器的缓存。
  10. /* updateCheck – 一个可选的boolean标识符,指定这个CacheManager是否通过Internet检查Ehcache的新版本。如果没有特别指明,updateCheck="true".
  11. /* monitoring – 一个可选的设置,决定CacheManager是否应该自动的用系统MBean服务器注册SampledCacheMBean。当下,这个监测。只有当使用Terracotta集群和使用Terracotta Developer Console时才有用。使用"autodetect"值,Terracotta集群的出现将被检测和监视,并通过Developer控制台激活。其他允许的值有:"on" 和 "off"。默认为"autodetect"。当使用JMX监测时,这个设置不会产生任何作用。
  12. /* dynamicConfig – 一个可选设置,能够使与这个CacheManager相关联的动态配置失活。这个设置的默认值是true-例如,动态配置是激活的。动态配置的缓存通过缓存的配置对象让他们的TTI, TTL 和maximum disk 和in-memory capacity在运行时改变。
  13. -->
  14. <ehcache xmlns:xsi="http://www.w3.org/2001/XMLSchema-instance"
  15. xsi:noNamespaceSchemaLocation="ehcache.xsd"
  16. updateCheck="true" monitoring="autodetect"
  17. dynamicConfig="true" >
  18. <!--
  19. DiskStore configuration
  20. =======================
  21. 磁盘存储器是可选的。关闭磁盘存储路径创建,解释下面的磁盘存储器元素。
  22. 对于任何缓存,如果你已经激活了overflowToDisk或diskPersistent,就要配置磁盘存储器。
  23. 如果他未配置,并且创建了一个需要磁盘存储的缓存,将会发出一个警告并且java.io.tmpdir将会自动使用。
  24. 磁盘存储器仅有一个属性- "path"。这个路径就是.data and .index文件被创建的目录路径。
  25. 如果这个路径是下述Java系统属性之一,他将会被运行中的VM中的值替换。为了向后兼容,这些应该被特别规定,而不会被${token}替换语法封闭。
  26. 下列属性翻译:
  27. /* user.home -用户的根目录
  28. /* user.dir – 用户的当前工作目录
  29. /* java.io.tmpdir – 默认临时文件路径
  30. /* ehcache.disk.store.dir – 一个系统属性,你通常用命令行指定;
  31. 例如: java -Dehcache.disk.store.dir=/u01/myapp/diskdir ...
  32. 子目录通过如下属性指定,例如:java.io.tmpdir/one
  33. -->
  34. <!--
  35. TransactionManagerLookup configuration
  36. ======================================
  37. TransactionManagerLookup 配置
  38. 这个类被ehcache用XA激活的ehcache来查找用于应用程序中的JTA TransactionManager。如果没有指定类,那么DefaultTransactionManagerLookup将以如下顺序找到TransactionManager。
  39. /*GenericJNDI(例如:jboss,属性jndiName控制TransactionManager对象的名称来查找)
  40. /*Websphere
  41. /*Bitronix
  42. /*Atomikos
  43. 你可以提供自己的查找类实现net.sf.ehcache.transaction.manager.TransactionManagerLookup接口。
  44. <!--
  45. CacheManagerEventListener
  46. =========================
  47. 指定一个CacheManagerEventListenerFactory,当缓存被增加或从CacheManager移除时被告知。
  48. CacheManagerEventListenerFactory的属性有:
  49. /* class – 一个完全限定的工厂类名。
  50. /* properties – 逗号隔开的属性只对工厂有意义。
  51. overflowToDisk:设置元素是否能溢出磁盘,当存储器容量达到最大存储限制。
  52. 如下属性和元素是可选的。
  53. timeToIdleSeconds:
  54. Sets the time to idle for an element before it expires.
  55. 设置一个元素在过期前的空闲时间
  56. i.e. The maximum amount of time between accesses before an element expires
  57. Is only used if the element is not eternal.
  58. 换言之,最大时间数在进入之后和元素过期之前这段时间之间,只有元素在非持久化时才有用。
  59. Optional attribute. A value of 0 means that an Element can idle for infinity.
  60. 可选属性,0表示一个元素可以无限的空闲
  61. The default value is 0.
  62. 默认值是0。
  63. timeToLiveSeconds:
  64. Sets the time to live for an element before it expires.
  65. i.e. The maximum time between creation time and when an element expires.
  66. Is only used if the element is not eternal.
  67. Optional attribute. A value of 0 means that and Element can live for infinity.
  68. The default value is 0.
  69. 在元素过期之前,设置一个存留时间。换言之,最大时间在创建时间和元素过期之间。仅用于元素非持久化。可选属性。值为0表示元素可无限存留,默认值是0
  70. diskPersistent:
  71. Whether the disk store persists between restarts of the Virtual Machine.
  72. The default value is false.
  73. 磁盘存储是否在虚拟机重启后持续存在。默认只是false。
  74. diskExpiryThreadIntervalSeconds:
  75. The number of seconds between runs of the disk expiry thread. The default value
  76. is 120 seconds.
  77. 秒数在运行和磁盘终止线程之间,默认值是120秒。
  78. diskSpoolBufferSizeMB:
  79. This is the size to allocate the DiskStore for a spool buffer. Writes are made
  80. to this area and then asynchronously written to disk. The default size is 30MB.
  81. Each spool buffer is used only by its cache. If you get OutOfMemory errors consider
  82. lowering this value. To improve DiskStore performance consider increasing it. Trace level
  83. logging in the DiskStore will show if put back ups are occurring.
  84. 这是为后台打印缓冲分配在DiskStore的大小。在这一区域进行写入,并同步写入磁盘。默认值是30M。每个后台缓冲区仅由他的缓存使用,如出现OutOfMemory错误,考虑降低该值。为了提高DiskStore性能,考虑增加它。跟踪级别的DiskStore工作 将显示是否推迟出现。
  85. clearOnFlush:
  86. whether the MemoryStore should be cleared when flush() is called on the cache.
  87. By default, this is true i.e. the MemoryStore is cleared.
  88. 当flush()在缓存中被调用时,MemoryStore是否被清除。默认是true,即MemoryStore被清除。
  89. memoryStoreEvictionPolicy:
  90. Policy would be enforced upon reaching the maxElementsInMemory limit. Default
  91. policy is Least Recently Used (specified as LRU). Other policies available -
  92. First In First Out (specified as FIFO) and Less Frequently Used
  93. (specified as LFU)
  94. Cache elements can also contain sub elements which take the same format of a factory class
  95. and properties. Defined sub-elements are:
  96. 当达到maxElementsInMemory限制时,策略将强制执行。策略是最近最少使用的算法(简称为LRU)。其他的策略通用。缓存元素也可以有子元素,子元素拥有相同格式的工厂类和属性。定义的sub-elements有:
  97. /* cacheEventListenerFactory - Enables registration of listeners for cache events, such as
  98. put, remove, update, and expire.
  99. /* cacheEventListenerFactory – 启用缓存事件监听器的注册,如put, remove, update, and expire.
  100. /* bootstrapCacheLoaderFactory - Specifies a BootstrapCacheLoader, which is called by a
  101. cache on initialisation to prepopulate itself.
  102. /* bootstrapCacheLoaderFactory – 指定一个BootstrapCacheLoader,它被一个缓存在初始化时调用,用来预填充自己。
  103. /* cacheExtensionFactory - Specifies a CacheExtension, a generic mechansim to tie a class
  104. which holds a reference to a cache to the cache lifecycle.
  105. /* cacheExtensionFactory – 指定一个CacheExtension,一个通用的mechansim来联系一个保存引用到缓存的类到缓存生命周期。
  106. /* cacheExceptionHandlerFactory - Specifies a CacheExceptionHandler, which is called when
  107. cache exceptions occur.
  108. /* cacheExceptionHandlerFactory – 指定一个CacheExceptionHandler,每当缓存异常出现时调用。
  109. /* cacheLoaderFactory - Specifies a CacheLoader, which can be used both asynchronously and
  110. synchronously to load objects into a cache. More than one cacheLoaderFactory element
  111. can be added, in which case the loaders form a chain which are executed in order. If a
  112. loader returns null, the next in chain is called.
  113. /* cacheLoaderFactory – 指定一个CacheLoader,能够同步和异步装载对象到一个缓存。可以添加多个cacheLoaderFactory元素,在这种情况装载机形成一个链,被有序的执行。如果一个装载机返回null,下一个链就被调用。
  114. Cache Event Listeners
  115. 缓存事件监听器
  116. All cacheEventListenerFactory elements can take an optional property listenFor that describes
  117. which events will be delivered in a clustered environment. The listenFor attribute has the
  118. following allowed values:
  119. 所有的cacheEventListenerFactory元素能选取一个可选属性listenFor描述的事件将在一个集群环境中交付。这个listenFor属性有如下允许的值:
  120. /* all - the default is to deliver all local and remote events
  121. /* local - deliver only events originating in the current node
  122. /* remote - deliver only events originating in other nodes
  123. /* all – 默认交付所有的本地和远程事件
  124. /* local – 交付的只是源于当前节点的事件
  125. /* remote - 交付的只是源于其他节点
  126. Example of setting up a logging listener for local cache events:
  127. 设置一个本地缓存事件监听器的例子:
  128. <cacheEventListenerFactory class="my.company.log.CacheLogger"
  129. listenFor="local" />
  130. Cache Exception Handling
  131. 缓存异常处理
  132. ++++++++++++++++++++++++
  133. By default, most cache operations will propagate a runtime CacheException on failure. An
  134. interceptor, using a dynamic proxy, may be configured so that a CacheExceptionHandler can
  135. be configured to intercept Exceptions. Errors are not intercepted.
  136. 通常,大多数cache运行失败将产生运行时CacheException。通过使用代理,一个拦截器应该被配置,以便于能够配置CacheExceptionHandler拦截异常。错误并不被拦截。
  137. It is configured as per the following example:
  138. 按照下面的例子配置:
  139. <cacheExceptionHandlerFactory class="com.example.ExampleExceptionHandlerFactory"
  140. properties="logLevel=FINE"/>
  141. Caches with ExceptionHandling configured are not of type Cache, but are of type Ehcache only,
  142. and are not available using CacheManager.getCache(), but using CacheManager.getEhcache().
  143. 有ExceptionHandling配置的缓存并不是典型的Cache,但却是典型的Ehcache,并且不能使用CacheManager.getCache(),但能够使用CacheManager.getEhcache()。
  144. Cache Loader
  145. 缓存装载
  146. ++++++++++++
  147. A default CacheLoader may be set which loads objects into the cache through asynchronous and
  148. synchronous methods on Cache. This is different to the bootstrap cache loader, which is used
  149. only in distributed caching.
  150. 一个默认的CacheLoader应该被设置成这样,能够通过Cache中的同步和异步方法装载对象到缓存中。这和仅在分布是缓存中被用到的缓存装载引导程序是不同的。
  151. It is configured as per the following example:
  152. 按照如下示例配置:
  153. <cacheLoaderFactory class="com.example.ExampleCacheLoaderFactory"
  154. properties="type=int,startCounter=10"/>
  155. XA Cache
  156. ++++++++
  157. To enable an ehcache as a participant in the JTA Transaction, just have the following attribute
  158. 使ehcache作为JTA事务的参与者,只需要如下属性。
  159. transactionalMode="xa", otherwise the default is transactionalMode="off"
  160. transactionalMode="xa", 否则,默认是 transactionalMode="off"
  161. Cache Writer
  162. ++++++++++++
  163. A CacheWriter maybe be set to write to an underlying resource. Only one CacheWriter can be
  164. been to a cache.
  165. 一个CacheWriter可以设置写到底层资源中。只有一个CacheWriter能够成为一个cache。
  166. It is configured as per the following example for write-through:
  167. 按照如下示例配置write-through:
  168. <cacheWriterFactory class="net.sf.ehcache.writer.TestCacheWriterFactory"
  169. properties="type=int,startCounter=10"/>
  170. And it is configured as per the following example for write-behind:
  171. 按照如下示例配置write-behind:
  172. <cacheWriter writeMode="write-behind" minWriteDelay="1" maxWriteDelay="5"
  173. rateLimitPerSecond="5" writeCoalescing="true" writeBatching="true" writeBatchSize="1"
  174. retryAttempts="2" retryAttemptDelaySeconds="1">
  175. <cacheWriterFactory class="net.sf.ehcache.writer.TestCacheWriterFactory"
  176. properties="type=int,startCounter=10"/>
  177. The cacheWriter element has the following attributes:
  178. cacheWriter元素有如下属性:
  179. /* writeMode: the write mode, write-through or write-behind
  180. These attributes only apply to write-through mode:
  181. 这些属性仅适用于write-through模式:
  182. /* notifyListenersOnException: Sets whether to notify listeners when an exception occurs on a writer operation.
  183. /* notifyListenersOnException:设置当一个写操作出现异常时是否告知监听器。
  184. These attributes only apply to write-behind mode:
  185. 这些属性仅适用于write-behind模式:
  186. /* minWriteDelay: Set the minimum number of seconds to wait before writing behind. If set to a value greater than 0,
  187. it permits operations to build up in the queue. This is different from the maximum write delay in that by waiting
  188. a minimum amount of time, work is always being built up. If the minimum write delay is set to zero and the
  189. CacheWriter performs its work very quickly, the overhead of processing the write behind queue items becomes very
  190. noticeable in a cluster since all the operations might be done for individual items instead of for a collection
  191. of them.
  192. /* minWriteDelay:设置write-behind之前的等待最小秒数。如果设置值比0大,则允许操作建立在队列中。和最大写入延迟不同,通过等待的最短时间,工作将同时被建立。如果最小写入延迟设置成0,并且CacheWriter快速执行程序,在一个集群中处理队列项目后的写入开销将会非常显著,因为所有的运行被单个项目完成,代替他们的一个集合。
  193. /* maxWriteDelay: Set the maximum number of seconds to wait before writing behind. If set to a value greater than 0,
  194. it permits operations to build up in the queue to enable effective coalescing and batching optimisations.
  195. /* maxWriteDelay:设置在后面写入之前等待的最大秒数。如设置值为0,它允许在队列里建立运行程序,以便有效地合并和批量优化。
  196. /* writeBatching: Sets whether to batch write operations. If set to true, writeAll and deleteAll will be called on
  197. the CacheWriter rather than write and delete being called for each key. Resources such as databases can perform
  198. more efficiently if updates are batched, thus reducing load.
  199. /* writeBatching:设置是否批量写入操作。如果设为true,writeAll 和deleteAll将调用CacheWriter,而不是为每个键调用write和delete。如果更新是批量的,诸如数据库资源可以更高效的执行,因此减少了负荷。
  200. /* writeBatchSize: Sets the number of operations to include in each batch when writeBatching is enabled. If there are
  201. less entries in the write-behind queue than the batch size, the queue length size is used.
  202. /* writeBatchSize:当writeBatching处于激活时,设置每批包含的操作的数目。如果write-behind队列的实体数少于每批的数目,就使用队列的长度。
  203. /* rateLimitPerSecond: Sets the maximum number of write operations to allow per second when writeBatching is enabled.
  204. /* rateLimitPerSecond:当writeBatching激活时,设置写操作每秒允许的最大数目。
  205. /* writeCoalescing: Sets whether to use write coalescing. If set to true and multiple operations on the same key are
  206. present in the write-behind queue, only the latest write is done, as the others are redundant.
  207. /* writeCoalescing: 设置是否使用写入联合。如果设为true并且同样的键有多个操作出现在write-behind队列,只有最新的写入完成,因为其他的成了多余的。
  208. /* retryAttempts: Sets the number of times the operation is retried in the CacheWriter, this happens after the
  209. original operation.
  210. /* retryAttempts:设置CacheWriter中重复操作的总次数,这发生在初次操作之后。
  211. /* retryAttemptDelaySeconds: Sets the number of seconds to wait before retrying an failed operation.
  212. /* retryAttemptDelaySeconds:设置在失败操作重试之前等待的秒数。
  213. Cache Extension
  214. +++++++++++++++
  215. CacheExtensions are a general purpose mechanism to allow generic extensions to a Cache.
  216. CacheExtensions are tied into the Cache lifecycle.
  217. CacheExtensions是一个总的作用机制允许Cache有普通异常。CacheExtensions与Cache生命周期紧密相连。
  218. CacheExtensions are created using the CacheExtensionFactory which has a
  219. createCacheCacheExtension() method which takes as a parameter a
  220. Cache and properties. It can thus call back into any public method on Cache, including, of
  221. course, the load methods.
  222. 创建CacheExtensions 来使用CacheExtensionFactory,他有一个createCacheCacheExtension()方法可以当做一个参数一个Cache和属性。因此CacheExtensions能够回调所有Cache中的公有方法,当然,包括装载方法。
  223. Extensions are added as per the following example:
  224. 按照如下示例增加Extensions:
  225. <cacheExtensionFactory class="com.example.FileWatchingCacheRefresherExtensionFactory"
  226. properties="refreshIntervalMillis=18000, loaderTimeout=3000,
  227. flushPeriod=whatever, someOtherProperty=someValue ..."/>
  228. Terracotta Clustering
  229. +++++++++++++++++++++
  230. Cache elements can also contain information about whether the cache can be clustered with Terracotta.
  231. The sub-element has the following attributes:
  232. Cache元素也包含了有关是否缓存能和Terracotta聚集的信息。子元素有如下属性:
  233. /* clustered=true|false - indicates whether this cache should be clustered with Terracotta. By
  234. default, if the element is included, clustered=true.
  235. /* clustered=true|false – 显示这个cache是否应该和Terracotta聚集。如果包括元素,默认的是clustered=true。
  236. /* valueMode=serialization|identity - indicates whether this cache should be clustered with
  237. serialized copies of the values or using Terracotta identity mode. By default, values will
  238. be cached in serialization mode which is similar to other replicated Ehcache modes. The identity
  239. mode is only available in certain Terracotta deployment scenarios and will maintain actual object
  240. identity of the keys and values across the cluster. In this case, all users of a value retrieved from
  241. the cache are using the same clustered value and must provide appropriate locking for any changes
  242. made to the value (or objects referred to by the value).
  243. /* valueMode=serialization|identity – 指出是否这个cache和值的序列化拷贝聚合或者使用Terracotta鉴定模式。通常,值将会在序列化模式中缓存,这和其他的再生Ehcache模式相似。身份模式只有在某些Terracotta部署方案中有效,并且通过集群保持实际对象身份的键和值。在这种情况下,所有从缓存取值的用户都使用相同的集群值,并且必须对值(或者值所引用的对象)的任何改变提供了合适的锁定。
  244. /* synchronousWrites=true|false - When set to true, clustered caches use
  245. Terracotta SYNCHRONOUS WRITE locks. Asynchronous writes (synchronousWrites="false") maximize performance by
  246. allowing clients to proceed without waiting for a "transaction received" acknowledgement from the server.
  247. Synchronous writes (synchronousWrites="true") maximize data safety by requiring that a client receive server
  248. acknowledgement of a transaction before that client can proceed. If coherence mode is disabled using
  249. configuration (coherent="false") or through the coherence API, only asynchronous writes can occur
  250. (synchronousWrites="true" is ignored). By default this value is false (i.e. clustered caches use normal
  251. Terracotta WRITE locks).
  252. /* synchronousWrites=true|false – 当设为true时,缓存集群使用Terracotta SYNCHRONOUS WRITE锁。异步写入(synchronousWrites="false")最大的性能允许客户端继续而无需等待"transaction received"服务器的回应。同步写入(synchronousWrites="true")最大数据安全性,要求客户端再继续之前接收服务器端的事务响应。如果coherence模式不能使用配置(coherent="false")或者通过coherence API,仅异步写入能够存在(synchronousWrites="true"被忽略)。通常,这个值为false(例. 聚集缓存使用正常的Terracotta WRITE锁)。
  253. /* coherent=true|false - indicates whether this cache should have coherent reads and writes with guaranteed
  254. consistency across the cluster. By default, its value is true. If this attribute is set to false
  255. (or "incoherent" mode), values from the cache are read without locking, possibly yielding stale data.
  256. Writes to a cache in incoherent mode are batched and applied without acquiring cluster-wide locks,
  257. possibly creating inconsistent values across cluster. Incoherent mode is a performance optimization
  258. with weaker concurrency guarantees and should generally be used for bulk-loading caches, for loading
  259. a read-only cache, or where the application that can tolerate reading stale data. This setting overrides
  260. coherentReads, which is deprecated.
  261. /* coherent=true|false – 指出是否这个缓存应使读和写前后一致并通过集群确保其一致性。通常默认值是true。如这个属性被设为false(或"incoherent"模式),缓存里没有锁定直接读取的值,可能产生坏的数据。随着并发保证的减弱,Incoherent模式是最优化性能,应该用于bulk-loading缓存,用于装载一个只读缓存,或用于程序中能够容忍读取损坏数据的地方。这个设置重载了coherentReads,这是不赞成的。
  262. /* copyOnRead=true|false - indicates whether cache values are deserialized on every read or if the
  263. materialized cache value can be re-used between get() calls. This setting is useful if a cache
  264. is being shared by callers with disparate classloaders or to prevent local drift if keys/values
  265. are mutated locally w/o putting back to the cache. NOTE: This setting is only relevant for caches
  266. with valueMode=serialization
  267. /* copyOnRead=true|false – 指出是否每个读出的缓存值是反序列化的,或者,是否具体的缓存值能够在get()调用之间被重用。这个设置很有用,如果一个缓存被不同的类装载器的调用者共享,或是阻止本地偏移如果键/值被组织本地w/o放回缓存。注意:这个设置仅对valueMode=serialization的缓存有意义。
  268. Simplest example to indicate clustering:
  269. 最简单的集群实例:
  270. To indicate the cache should not be clustered (or remove the element altogether):
  271. 指明缓存不被聚集(或一起移除元素)
  272. To indicate the cache should be clustered using identity mode:
  273. 表示使用模式聚集缓存:
  274. To indicate the cache should be clustered using incoherent mode for bulk load:
  275. 对大量的装载使用incoherent模式聚集缓存。
  276. To indicate the cache should be clustered using synchronous-write locking level:
  277. 使用synchronous-write锁定水平应该聚集缓存。
  278. -->
  279. <!--
  280. Mandatory Default Cache configuration. These settings will be applied to caches
  281. created programmtically using CacheManager.add(String cacheName).
  282. 强制预设缓存配置。这个设置将应用于缓存创建CacheManager.add(String cacheName)。
  283. The defaultCache has an implicit name "default" which is a reserved cache name.
  284. defaultCache有一个内涵的名称“default”,是一个预设的缓存名称。
  285. -->
  286. <defaultCache
  287. maxElementsInMemory="0"
  288. eternal="false"
  289. timeToIdleSeconds="1200"
  290. timeToLiveSeconds="1200">
  291. <!--
  292. Sample caches. Following are some example caches. Remove these before use.
  293. 缓存样本。以下是一些缓存实例,在使用前删掉这些。
  294. -->
  295. <!--
  296. Sample cache named sampleCache1
  297. This cache contains a maximum in memory of 10000 elements, and will expire
  298. an element if it is idle for more than 5 minutes and lives for more than
  299. 10 minutes.
  300. 缓存实例名为sampleCache1,这个缓存的最大存储量为10000个元素,如果一个元素空闲时间超过5分钟就会失效并且生命周期超过10分钟。
  301. If there are more than 10000 elements it will overflow to the
  302. disk cache, which in this configuration will go to wherever java.io.tmp is
  303. defined on your system. On a standard Linux system this will be /tmp"
  304. 如果超过了10000个元素,磁盘缓存将会溢出,在这个缓存中,这个配置将找到你系统中任何定义java.io.tmp的地方。在标准的Linux系统中,这将会是/tmp"。
  305. -->
  306. <cache name="sampleCache1"
  307. maxElementsInMemory="10000"
  308. maxElementsOnDisk="1000"
  309. eternal="false"
  310. overflowToDisk="true"
  311. diskSpoolBufferSizeMB="20"
  312. timeToIdleSeconds="300"
  313. timeToLiveSeconds="600"
  314. memoryStoreEvictionPolicy="LFU"
  315. />
  316. <!--
  317. Sample cache named sampleCache2
  318. 实例缓存sampleCache2
  319. This cache has a maximum of 1000 elements in memory. There is no overflow to disk, so 1000
  320. is also the maximum cache size. Note that when a cache is eternal, timeToLive and
  321. timeToIdle are not used and do not need to be specified.
  322. 这个缓存的最大存储容量是1000个元素。没有磁盘溢出,因此,1000也是缓存的最大长度。要注意的是,当缓存持久化后, timeToLive和timeToIdle将不被使用,并且不需要特别指定。
  323. -->
  324. <cache name="sampleCache2"
  325. maxElementsInMemory="1000"
  326. eternal="true"
  327. overflowToDisk="false"
  328. memoryStoreEvictionPolicy="FIFO"
  329. />
  330. <!--
  331. Sample cache named sampleCache3. This cache overflows to disk. The disk store is
  332. persistent between cache and VM restarts. The disk expiry thread interval is set to 10
  333. minutes, overriding the default of 2 minutes.
  334. 示例sampleCache3。这个缓存溢出到磁盘。磁盘存储在缓存和VM重启的时候是持续的。磁盘期满间隔设置为10分钟,覆盖原来的2分钟。
  335. -->
  336. <cache name="sampleCache3"
  337. maxElementsInMemory="500"
  338. eternal="false"
  339. overflowToDisk="true"
  340. timeToIdleSeconds="300"
  341. timeToLiveSeconds="600"
  342. diskPersistent="true"
  343. diskExpiryThreadIntervalSeconds="1"
  344. memoryStoreEvictionPolicy="LFU"
  345. />
  346. <!--
  347. Sample Terracotta clustered cache named sampleTerracottaCache.
  348. This cache uses Terracotta to cluster the contents of the cache.
  349. Terracotta集群缓存示例sampleTerracottaCache。这个缓存使用Terracotta聚集缓存内容。
  350. -->
  351. <cache name="sampleTerracottaCache"
  352. maxElementsInMemory="1000"
  353. eternal="false"
  354. timeToIdleSeconds="3600"
  355. timeToLiveSeconds="1800"
  356. overflowToDisk="false">
  357. <!--
  358. Sample xa enabled cache name xaCache
  359. Xa激活缓存示例xaCache
  360. -->
  361. <cache name="xaCache"
  362. maxElementsInMemory="500"
  363. eternal="false"
  364. timeToIdleSeconds="300"
  365. timeToLiveSeconds="600"
  366. overflowToDisk="false"
  367. diskPersistent="false"
  368. diskExpiryThreadIntervalSeconds="1"
  369. transactionalMode="xa">
  370. 设置完全限定类名被注册为CacheManager事件监听器。
  371. 事件包括:
  372. /* adding a Cache增加一个缓存
  373. /* removing a Cache移除一个缓存
  374. 设置元素是否持久化,如果持久化,将忽视超时并且元素永不过期。
  375. 回调监听器的方法有同步和异步两种。安全的处理潜在的麻烦和线程安全问题将是实施者的责任,这依取决于他们的监听器在干什么。
  376. 如果没有类指定,就不会创建监听器。这里没有默认值。
  377. <!--
  378. TerracottaConfig
  379. ========================
  380. maxElementsOnDisk:
  381. 设置磁盘存储器维持的对象的最大数目。默认是0,意味着没有限制。
  382. eternal:
  383. 激活Terracotta集群选项)
  384. 注意:你需要安装运行一个或多个Terracotta服务器来使用Terracotta集群。
  385. 参看http://www.terracotta.org/web/display/orgsite/Download
  386. 使用多个Terracotta服务器实例URLs(容错能力)的例子
  387. maxElementsInMemory:
  388. 设置创建到存储器中的对象的最大数目。
  389. 在ehcache配置文件中嵌入一个Terracotta配置文件简单的放置一个普通的Terracotta XML配置到元素中。
  390. Example:
  391. app/logs-%i
  392. 更多的Terracotta信息,参看Terracotta文档。
  393. -->
  394. <!--
  395. Cache configuration
  396. ===================
  397. The following attributes are required.
  398. 如下属性都需要:
  399. name:
  400. 设置缓存的名称。用于鉴定缓存,他必须是唯一的。
  401. 指定一个TerracottaConfig用于为CacheManager配置Terracotta运行时。
  402. 配置文件可以通过两种主要方式指定:通过引用配置文件或者使用Terracotta嵌入式配置文件。
  403. 使用URL属性指定一个配置资源(或者多个)的引用。URL属性必须包含一个逗号隔开的列表:
  404. /* path(Terracotta配置文件的路径)(通常命名为 tc-config.xml)
  405. /* URL Terracotta配置文件的URL
  406. /* : Terracotta服务器运行实例
  407. 最简单的例子指出这台机器上的一个Terracotta服务器:
  408. 使用Terracotta配置文件路径的例子:
  409. 使用Terracotta配置文件URL的例子:

  410. <?xml version="1.0" encoding="UTF-8"?> 设置完全限定类名被注册为CacheManager事件监听器。 事件包括: / adding a Cache增加一个缓存 / removing a Cache移除一个缓存 设置元素是否持久化,如果持久化,将忽视超时并且元素永不过期。 回调监听器的方法有同步和异步两种。安全的处理潜在的麻烦和线程安全问题将是实施者的责任,这依取决于他们的监听器在干什么。 如果没有类指定,就不会创建监听器。这里没有默认值。 <!-- Cache configuration =================== The following attributes are required. 如下属性都需要: name: 设置缓存的名称。用于鉴定缓存,他必须是唯一的。 指定一个TerracottaConfig用于为CacheManager配置Terracotta运行时。 配置文件可以通过两种主要方式指定:通过引用配置文件或者使用Terracotta嵌入式配置文件。 使用URL属性指定一个配置资源(或者多个)的引用。URL属性必须包含一个逗号隔开的列表: / path(Terracotta配置文件的路径)(通常命名为 tc-config.xml) / URL Terracotta配置文件的URL /* : Terracotta服务器运行实例 最简单的例子指出这台机器上的一个Terracotta服务器: 使用Terracotta配置文件路径的例子: 使用Terracotta配置文件URL的例子: 分享到:

Spring 3.0.5 MVC 基于注解ehcache.xml 配 ... | 过滤掉非指定保留的html元素,保留元素间的 ...

评论

发表评论

您还没有登录,请您登录后再发表评论

zuzong的博客

zuzong

  • 浏览: 24410 次
  • 性别: Icon_minigender_1
  • 来自: 济南
  • 最近访客 更多访客>>

小菜菜的博客

小菜菜

donald3003a的博客

donald3003a china_ymex的博客

china_ymex

dylinshi126的博客

dylinshi126

文章分类

存档分类

浅析无线网络数据窥探技术

Posted on

浅析无线网络数据窥探技术

Crow 2012-08-14

记得几年前,蓝牙一时兴起,当时在十几米的范围内,就可覆盖了很多个蓝牙接入点,那个时候还在上学,上课时无聊,就会找一些蓝牙接入点来恶作剧,后来蓝牙这个东西慢慢的在人们的眼中变得不重要,取而代之的是覆盖到各处的wi-fi网络,各处餐厅,地铁,公司,大街小巷随处可以搜索到不知道从何而来的wi-fi信号,而hacking wifi技术也犹然而生。

这部分的技术大多来自国外翻译文章,技术出处大致相同,但是关于原理问题有些人并不了解,今天就和大家一起分享下hacking wi-fi技术。

Let’s go!!

无线网络可分为广义无线网络狭义无线网络

广义无线网络包含了大家所熟知的wlan,wpan,wwan

wlan 无线局域网络(Wireless Local Area Networks;WLAN)是相当便利的数据传输系统,它利用射频(Radio Frequency;RF)的技术,取代旧式碍手碍脚的双绞铜线(Coaxial)所构成的局域网络,使得无线局域网络能利用简单的存取架构让用户透过它,达到「信息随身化、便利走天下」的理想境界。

wpan

无线个人局域网通讯技术(WPAN:Wireless Personal Area Network Communication Technologies)其中最典型且被大家熟知的技术包括:Bluetooth(蓝牙),IrDa(红外)另外还包括ZigBee,UWB,HomeRF等,基于IEEE 802.15.(1-4)。

狭义无线网络既大家常用的IEEE 802.11标准的无线网络,关于802.11的标准及发展,大家可以再百度百科中查询。

无线网络的工作原理

无线网络至少要有一个无线接入点,即AP(Access Point)和一个client(无线客户端)组成,其中AP会将SSID由beacons(信号台)封装并广播,1Mbit/s的速率为1次/100ms。而无线clinet即为可接收这个SSID广播封包的设备,此处可由无线client来决定是否要与此AP发出的信号连接,所以可以选择任意的SSID进行连接。

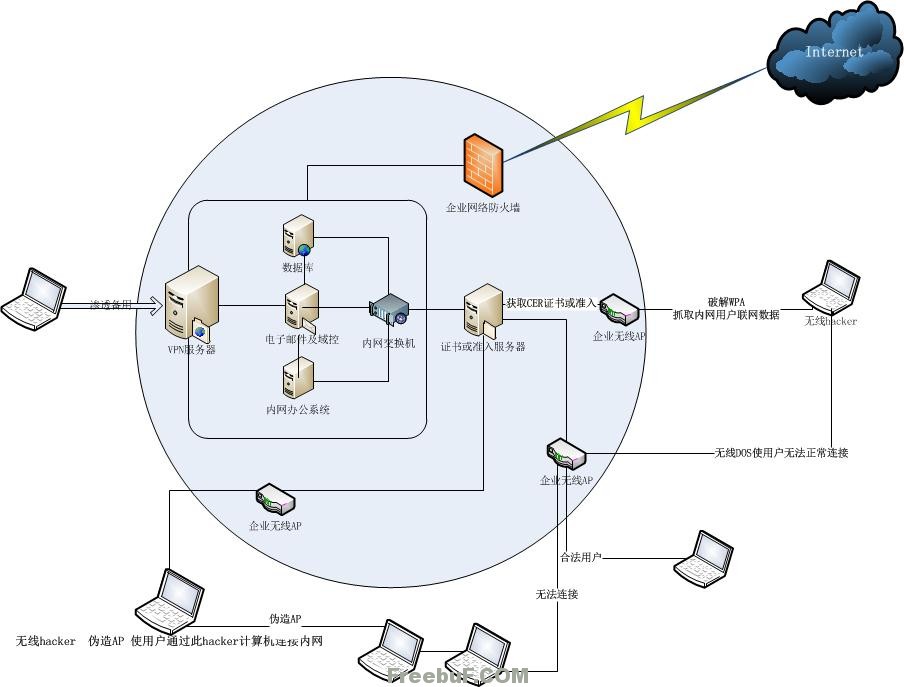
记得上次,写了一个有关企业内网的文章,其中技术细节并不是很明确,所以今天可以给大家提供一个无线方面的思路,示意图如下:

20120813011346_15444( "FreebuF.COM")

图画的不算太好,大家凑合着看吧

无线安全对于企业安全来说也是尤为重要的一处,现在大多数企业都会采用笔记本作为工作电脑,便携而且对于网络上的分配极为方便。

利用

对于无线上的入侵推荐使用BT5,或者自己使用ubuntu集成aircreak也好。 此处演示基于虚拟机BT5,及USB外置网卡 WEP方式加密现在已经很少了,就此略过,WPA的演示,可参见http://www.freebuf.com/articles/5012.html

首先我们先来看下BT5下集成的无线工具,输入air,TAB键

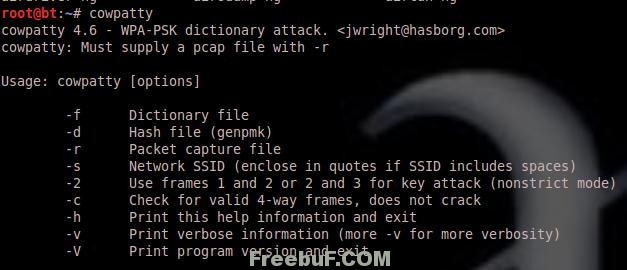
可见aircreak系列的软件已经集成很多,这些足够我们在日常破解使用 Aircreak-ng既集成了破解功能,另外大家还可以使用cowpatty

OK,现在我们载入无线网卡,iwconfig

由于网卡类型及驱动的原因,外置载入网卡不一定就是wlan0,当然名字也可以自定义配置。 在使用之前,建议大家先update一下

Airodump-ng-oui-update

下面启动无线网卡

ifconfig ra0 up

激活无线网卡至monitor

airmon-ng start ra0

然后开始一系列的密码破解,由于之前thanks写过此类文章(《Wifi Hacking),所以这里就不在写了

那么我们要做什么呢?

刚在前面的图中画了了一下AP欺骗的问题 那么下面我们就来抓取数据包,并加以分析

Airodump-ng –c 6 –w crowlog mon0

这里-c是选择接收频道,-w是保存截获数据包名称,后面是网卡

我们也可以对airodump-ng中所示的ssid进行抓包,我这里由于链接无线网的人很少,已经半夜了,所以就不演示了 等抓取了足够的无线网络数据后,就可以Ctrl+C停止了。接下来我们可以使用Cain或者Wireshark来查看数据包了

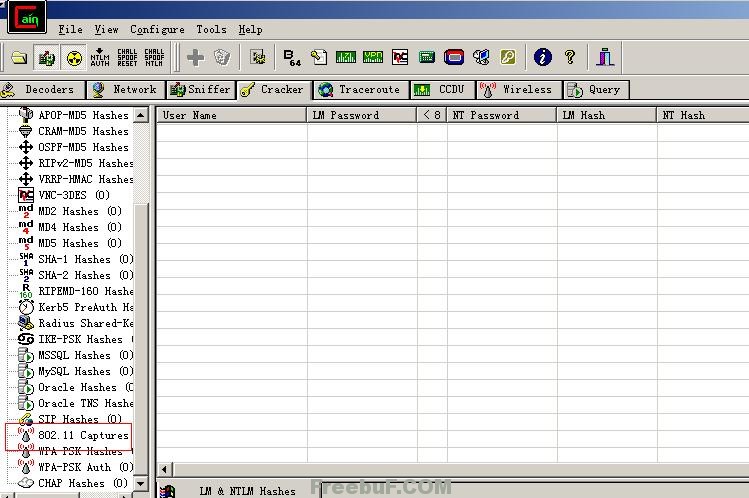
打开Cain,选择Creaker,点击左侧分类栏的802.11Captures。

22222

右键空白处,Add to list

然后Decode开始解密

此处需要强调一下,破解数据包是需要在破解了无线密码的前提下才可以的

下面输入无线密码即可开始破解

解密完成后,会出现同文件名+dec.cap的文件,将此文件放入wireshark中打开,

然后我们就可以开始分析不过的无线数据破解后的报文啦!

由于我这边抓取来的数据只有几十K,半夜1点钟了,所以就不截图抓取的数据了,感兴趣的朋友可以自己试试。

其中的QQ,MSN,email,登陆用的账号密码都可以看到,这块就要看大家是否细心了。多看看数据包,里面或许有很多有用的东西,如杀毒软件版本,输入法版本等。

这里凡是公开了密码的免费上网区,都是很容易下手的,比如在某咖啡厅,或者某机场,看到有漂亮MM在用笔记本上QQ或者MSN,这个密码基本上都是可知的,不需要费力去破解,然而当知道了密码后,所有弥漫在空中的,看不见的无线信号,便都在自己的掌控之下。抓取他们,得到他们以后。所有的数据便都是自己的了。在或者在公司,密码可知,权限开放,那么无线网段的数据便全部在自己的掌控之中。然而,捕获无线数据的方法有很多种。如固定mac地址捕获数据

aireplay-ng -0 3 –a ap的mac地址–c client的mac地址ra0

deauth攻击模式,来将现有的(指定mac)的无线客户端强制断开,这样客户端就需要重新连接网络,这样我们就会抓到完整的wpa-psk握手验证的数据包了。

Aircrack-ng –w dic cap文件

可以用来破解抓取到的wpa-psk数据报文。

入侵是可以多种多样的,不必拘于一个教程,或者一个工具。

最后,无线网络正大面积覆盖着全世界,并走向各家各户,小到自建的无线基站,大到移动联通的CMCC和WLAN,使越来越多的人处于同一个局域网,而与大家同在一个局域网内的黑客们,便成为了隐秘在无线网络中窥探所有人的幽灵。

(YY一下,刚看完幽灵那个电视剧,穿帮镜头挺多的,引用下这两个字儿吧)

Ehcache配置文件加载方式

Posted on

Ehcache配置文件加载方式 - crazyinsomnia的空间 - 开源中国社区

开源中国社区

10月20日杭州OSC源创会 正在报名

当前访客身份: 游客 [ 登录 | 加入开源中国 ] 你有0新留言

软件 代码 讨论区 新闻 博客

软件

关注(10) 粉丝(16) 积分(47)

青春是人生的实验课,错也错的很值得!! .发送留言 .请教问题

博客分类

  1. 1. WebApplicationContext : org.springframework.web.context.ContextLoaderListener作用
  2. 2. hibernate学习笔记:hibernate中的Cache管理
  3. 3. Document.location.href和document.location.replace的区别
  4. 4. web.xml 中的listener、 filter、servlet 加载顺序及其详解
  5. 5. jquery的extend和fn.extend
  6. 6. Struts2中的ActionContext
  7. 7. Struts2执行流程【图】
  8. 8. Ehcache配置文件加载方式

最新评论

空间 » 博客 » java » 博客正文

Ehcache配置文件加载方式

0人收藏此文章, 我要收藏 发表于2年前(2010-04-01 00:00) , 已有924次阅读 共4个评论

会在classpath路径下找ehcache.xml配置文件

CacheManager manager = new CacheManager();

也可以根据相对文件路径来加载配置文件

CacheManager manager = new CacheManager(“src/ehcache.xml”); .

通过相对与类路径的位置加载

URL url = getClass().getResource(“/ehcache.xml”);

CacheManager manager = new CacheManager(url);

通过流加载

InputSream fis = new FileInputStream(new File(“src/config/ehcache.xml”).getAbsolutePath()); 声明:OSCHINA 博客文章版权属于作者,受法律保护。未经作者同意不得转载。

开源中国-程序员在线工具:API文档大全(120+) JS在线编辑演示 二维码 更多>> 0 已有 0人顶

共有 4 条网友评论

通过URL加载,这个说法不太对哦 getClass().getResource(....) 主要是从类路径中加载

嘻嘻,是啊!:)

CacheManager manager = new CacheManager(url); url 是WEB-INF 下面的配置文件 怎么加载不进来啊!

引用来自“senge”的评论

CacheManager manager = new CacheManager(url); url 是WEB-INF 下面的配置文件 怎么加载不进来啊! 应该是读取的位置不对的吧.

文明上网,理性发言

文明上网,理性发言 回到页首 | 回到评论列表

关闭相关文章阅读

© 开源中国社区(OsChina.NET) | 关于我们 | 广告联系 | @新浪微博 | 开源中国手机版 | 粤ICP备12009483号-3

Java缓存组件 EhCache 入门教程

Posted on

Java缓存组件 EhCache 入门教程 - OPEN 开发经验库

登录 注册

OPEN开发经验库 所有分类 > 软件开发 > 缓存组件 > Ehcache

Java缓存组件 EhCache 入门教程

您的评价: 收藏该经验

1.技术背景:

系统缓存是位于应用程序与物理数据源之间,用于临时存放复制数据的内存区域,目的是为减少应用程序对物理数据源访问的次数,从而提高应用程序的运行性能。缓存设想内存是有限的,缓存的时效性也是有限的,所以可以设定内存数量的大小可以执行失效算法,可以在内存满了的情况下,按照最少访问等算法将缓存直接移除或切换到硬盘上。

Ehcache从Hibernate发展而来,逐渐涵盖了Cache界的全部功能,是目前发展势头最好的一个项目,具有快速、简单、低消耗、扩展性强、支持对象或序列化缓存,支持缓存或元素的失效,提供LRU、LFU和FIFO缓存策略,支持内存缓存和硬盘缓存和分布式缓存机制等特点。其中Cache的存储方式为内存或磁盘(ps:无须担心容量问题)

2.EhCahe的类层次介绍:

主要分为三层,最上层是CacheManager,它是操作Ehcache的入口。可以通过CacheManager.getInstance()获得一个单子的CacheManager,或者通过CacheManager的构造函数创建一个新的CacheManager。每个CacheManger都管理多个Cache。每个Cache都以一种类Hash的方式,关联多个Element。Element就是我们用于存放缓存内容的地方。

3.环境搭建:

很简单只需要将ehcache-2.1.0-distribution.tar.gz和ehcache-web-2.0.2-distribution.tar.gz挤压的jar包放入WEB-INF/lib下。

再创建一个重要的配置文件ehcache.xml,可以从ehcache组件包中拷贝一个,也可以自己建立一个,需要放到classpath下,一般放于/WEB-INF/classed/ehcache.xml;具体的配置文件可以网上搜一下

4.实际运用

一个网站的首页估计是被访问次数最多的,我们可以考虑给首页做一个页面缓存;

缓存策略:应该是某个固定时间之内不变的,比如说2分钟更新一次,以应用结构page-filter-action-service-dao-db为例。

位置:页面缓存做到尽量靠近客户的地方,就是在page和filter之间,这样的优点就是第一个用户请求后,页面被缓存,第二个用户在请求,走到filter这个请求就结束了,需要在走到action-service-dao-db,好处当然是服务器压力大大降低和客户端页面响应速度加快。

首页页面缓存存活时间定为2分钟,也就是参数timeToLiveSeconds(缓存的存活时间)应该设置为120,同时timeToIdleSeconds(多长时间不访问缓存,就清楚该缓存)最好也设为2分钟或者小于2分钟。


接着我们来看一下SimplePageCachingFilter 的配置, 查看源码打印?

01

<

filter

>

02

<

filter-name

indexCacheFilterfilter-name> 03

<

filter-class

>

04

net.sf.ehcache.constructs.web.filter.SimplePageCachingFilter 05

<

filter-class

>

06

<

filter

> 07

<

filter-mapping

>

08

<

filter-name

indexCacheFilterfilter-name> 09

<

url-pattern

/*index.actionurl-pattern>

10

<

filter-mapping

> 将上述代码加入到web.xml,那么当打开首页时,你会发现2分钟才会有一堆sql语句出现在控制台,也可以调整为5分钟,总之一切尽在掌控之中。

当然,如果你像缓存首页的部分内容时,你需要使用SimplePageFragmentCachingFilter这个filter,我看一下: 查看源码打印?

01

<

filter

>

02

<

filter-name

indexCacheFilterfilter-name> 03

<

filter-class

>

04

net.sf.ehcache.constructs.web.filter.SimplePageFragmentCachingFilter 05

<

filter-class

>

06

filter> 07

<

filter-mapping

>

08

<

filter-name

indexCacheFilterfilter-name> 09

<

url-pattern

/*/index_right.jsp<

url-pattern

>

10

<

filter-mapping

> 如此我们将jsp页面通过jsp:include到其他页面,这样就做到了页面局部缓存的效果,这一点貌似没有oscache的tag好用。

此外cachefilter中还有一个特性,就是gzip,也就是缓存中的元素是被压缩过的,如果客户端浏览器支持压缩的话,filter会直接返回压缩过的流,这样节省了带宽,把解压的工作交给了客户端浏览即可,当然如果客户端不支持gzip,那么filter会把缓存的元素拿出来解压后在返回给客户端浏览器(大多数爬虫是不支持gzip的,所以filter也会解压后在返回流)。

总之,Ehcache是一个非常轻量级的缓存实现,而且从1.2之后支持了集群,而且是hibernate默认的缓存provider,本文主要介绍Ehcahe对页面缓存的支持,但是它的功能远不止如此,要用好缓存,对J2ee中缓存的原理、适用范围、适用场景等等都需要比较深刻的理解,这样才能用好用对缓存。

为了大家通过实际例子加深了解与场景运用,在奉献一个实例:

/*在Spring中运用EhCache

适用任意一个现有开源Cache Framework,要求可以Cache系统中service或者DAO层的get/find等方法返回结果,如果数据更新(适用了Create/update/delete),则刷新cache中相应的内容。

根据需求,计划适用Spring AOP+enCache来实现这个功能,采用ehCache原因之一就是Spring提供了enCache的支持,至于为何仅仅支持ehcache而不支持oscache和jbosscache就无从得知了。

AOP少不了拦截器,先创建一个实现了MethodInterceptor接口的拦截器,用来拦截Service/DAO的方法调用,拦截到方法后,搜索该方法的结果在cache中是否存在,如果存在,返回cache中结果,如果不存在返回数据库查询结果,并将结果返回到缓存。

查看源码打印?

01

public

class

MethodCacheInterceptor

implements

MethodInterceptor, InitializingBean

02

{ 03

private

static

final

Log logger = LogFactory.getLog(MethodCacheInterceptor.

class

);

04

private

Cache cache; 05

public

void

setCache(Cache cache) {

06

this

.cache = cache; 07

}

08

public

MethodCacheInterceptor() { 09

super

();

10

} 11

///

12

/* 拦截Service/DAO 的方法,并查找该结果是否存在,如果存在就返回cache 中的值, 13

/* 否则,返回数据库查询结果,并将查询结果放入cache

14

/*/ 15

public

Object invoke(MethodInvocation invocation)

throws

Throwable {

16

String targetName = invocation.getThis().getClass().getName(); 17

String methodName = invocation.getMethod().getName();

18

Object[] arguments = invocation.getArguments(); 19

Object result;

20

logger.debug(

"Find object from cache is "

  • cache.getName()); 21

String cacheKey = getCacheKey(targetName, methodName, arguments);

22

Element element = cache.get(cacheKey); 23

Page

13

of

26

24

if

(element ==

null

) { 25

logger.debug(

"Hold up method , Get method result and create cache........!"

);

26

result = invocation.proceed(); 27

element =

new

Element(cacheKey, (Serializable) result);

28

cache.put(element); 29

}

30

return

element.getValue(); 31

}

32

/// 33

/* 获得cache key 的方法,cache key 是Cache 中一个Element 的唯一标识

34

/* cache key 包括包名+类名+方法名,如com.co.cache.service.UserServiceImpl.getAllUser 35

/*/

36

private

String getCacheKey(String targetName, String methodName, Object[] arguments) { 37

StringBuffer sb =

new

StringBuffer();

38

sb.append(targetName).append(

"."

).append(methodName); 39

if

((arguments !=

null

) && (arguments.length !=

0

)) {

40

for

(

int

i =

0

; i < arguments.length; i++) { 41

sb.append(

"."

).append(arguments[i]);

42

} 43

}

44

return

sb.toString(); 45

}

46

/// 47

/* implement InitializingBean,检查cache 是否为空

48

/*/ 49

public

void

afterPropertiesSet()

throws

Exception {

50

Assert.notNull(cache,

"Need a cache. Please use setCache(Cache) create it."

); 51

}

52

}

上面的代码可以看到,在方法invoke中,完成了搜索cache/新建cache的功能

随后,再建立一个拦截器MethodCacheAfterAdvice,作用是在用户进行create/update/delete操作时来刷新、remove相关cache内容,这个拦截器需要实现AfterRetruningAdvice接口,将会在所拦截的方法执行后执行在afterReturning(object arg0,Method arg1,Object[] arg2,object arg3)方法中所预定的操作 查看源码打印?

01

public

class

MethodCacheAfterAdvice

implements

AfterReturningAdvice, InitializingBean

02

{ 03

private

static

final

Log logger = LogFactory.getLog(MethodCacheAfterAdvice.

class

);

04

private

Cache cache; 05

Page

15

of

26

06

public

void

setCache(Cache cache) { 07

this

.cache = cache;

08

} 09

public

MethodCacheAfterAdvice() {

10

super

(); 11

}

12

public

void

afterReturning(Object arg0, Method arg1, Object[] arg2, Object arg3)

throws 13

Throwable {

14

String className = arg3.getClass().getName(); 15

List list = cache.getKeys();

16

for

(

int

i =

0

;i<list.size();i++){ 17

String cacheKey = String.valueOf(list.get(i));

18

if

(cacheKey.startsWith(className)){ 19

cache.remove(cacheKey);

20

logger.debug(

"remove cache "

  • cacheKey); 21

}

22

} 23

}

24

public

void

afterPropertiesSet()

throws

Exception { 25

Assert.notNull(cache,

"Need a cache. Please use setCache(Cache) create it."

);

26

} 27

} 该方法获取目标class的全名,如:com.co.cache.test.TestServiceImpl,然后循环cache的key list,刷新/remove cache中所有和该class相关的element。

接着就是配置encache的属性,如最大缓存数量、cache刷新的时间等等。 查看源码打印?

01

<

ehcache

>

02

<

diskStore

path

=

"c:\myapp\cache"

/> 03

<

defaultCache

04

maxElementsInMemory

=

"1000" 05

eternal

=

"false"

06

timeToIdleSeconds

=

"120" 07

timeToLiveSeconds

=

"120"

08

overflowToDisk

=

"true" 09

/>

10

<

cache

name

=

"DEFAULT_CACHE" 11

maxElementsInMemory

=

"10000"

12

eternal

=

"false" 13

timeToIdleSeconds

=

"300000"

14

timeToLiveSeconds

=

"600000" 15

overflowToDisk

=

"true"

16

/> 17

</

ehcache

> 这里需要注意的是defaultCache定义了一个默认的cache,这个Cache不能删除,否则会抛出No default cache is configured异常。另外由于使用拦截器来刷新Cache内容,因此在定义cache生命周期时可以定义较大的数值,timeToIdleSeconds="30000000",timeToLiveSeconds="6000000",好像还不够大?

然后再将Cache和两个拦截器配置到Spring的配置文件cache.xml中即可,需要创建两个“切入点”,分别用于拦截不同方法名的方法。在配置application.xml并且导入cache.xml。这样一个简单的Spring+Encache框架就搭建完成。

由于时间关系就介绍到这里,以后有机会还会介绍Ehcache在分布式集群系统中的使用,谢谢大家。 转自:http://blog.csdn.net/yangchao228/article/details/7027485 相关资讯  — 更多

-

内容信息

4.5 (已有8个人评价)

63% 25% 13% 0% 0%

浏览:1568次 贡献者:openkk 上传时间:2011-12-03 14:00:11 经验标签

EhCache

同类热门经验

1225次浏览

1125次浏览

1347次浏览

670次浏览

471次浏览

1002次浏览 相关经验

相关讨论 - 更多

联系我们 - 问题反馈

2005-2012 OPEN-OPEN, all rights reserved. -

收藏提示close

文件夹 请选择... ------------- 新增文件夹... 新增文件夹 标签 (多个标签用逗号分隔) 取消确认